Monday, October 25, 2021

Collected oddities 10/26/21

I keep grabbing pictures of bikes that illustrate some point or other, and then getting swept months past the moment to frame a post around them. The pictures sit on my desktop, cluttering things up, because they still illustrate a point. 

During what was either the twilight of steel frames or their first renaissance in the late 1990s, Big Bicycle was adding its offerings, with some classic geometries and deceptively classic looking details. Take "braze-ons" for instance. The term applied to any little widgets attached to the frame in addition to the basic construction of the frame joints themselves. You can do that with steel, even years after the original manufacture of the frame. You'll need to repaint after heating the tubing with the torch, but you can do it. It's one of the benefits of the material, compared to aluminum, which was starting to be the most common choice if you weren't in the carbon fiber or titanium price brackets.

Cable stops could be welded onto an aluminum frame during the building process, apparently, but water bottle mounts and rack bosses (if any) were commonly provided using rivet nuts. A hole is drilled in the tubing, and the threaded insert is crimped in there using a tool that expands it to grip tightly in the frame without the use of heat. It's a faster, cheaper process that's not just as good, but good enough for the bike industry. If it's good enough for aluminum, it's good enough for steel, right? The public's love for steel won't last long enough for the shortcoming to be obvious: the seam where the riv-nut joins the frame is a perfect starting point for rust. No matter how well you care for the frame, this area will always be more vulnerable than a proper braze-on. 

Carbon fiber has completely displaced steel among the performance-riding set. The Iron Age has become prehistory. But that doesn't mean we can't have some fun with the bikes while they're in our temporary possession. Check out what you can do to some Specialized graphics with a bit of strategically-applied tape:

From this
to this!

 
Whatever your bike is made of, keep it clean and safe.

The month of July was extremely wet. There has been enough rain since then to keep the trails silty. Little of it is actual mud. It's more a wet fine sand that does what you see here.

Speaking of safety, always make sure that your handlebar stem is no higher than the recommended safe height. For stems that insert into the fork, inside a threaded headset, the amount in the fork is intended to reinforce the threaded section so that the steerer tube does not crack at the stress riser where the threads begin. In other words, riding with the stem too high could cause the fork or the stem to break. Nevertheless, about once a week we will see a bike with the stem barely hanging in the top of the fork.

The black line shows the position of the max line engraved on the stem. The greasy part shows how little this person decided they needed to maintain control of their bike. Hot tip: if you're ever on a group ride, don't just inspect your own bike. Try to take a look at the bikes you might be drafting, or riding beside on a bumpy descent.

Beginning in the early teens of this century, you started seeing the phrase, "Biking is the new golf." You were just as likely to see, quite soon after that assertion first started making the rounds, that it most definitely wasn't the new golf, but the truism was out there already.

Seems like there's some connection, anyway.
Some things are just weird in their own right. This inner tube tied itself into a knot when I shook it up in the talc bag and then put a bit of air in it to install it in a tire. It reminded me of certain people who could eat the maraschino cherry out of their drink and tie the stem in a knot with their tongue before removing it from their mouth.

We find other entanglements, too. The double helix of DNA has nothing on the quadruple helix of WTF.

Sometimes, twists like this can happen because someone took their handlebars out of the stem clamp and flipped them over a time or two before putting them back. But this spiral was more complicated than that. I wondered if it was someone's innovation to keep the cables under control when turning the bars. I did not try to undo it, because it didn't seem to be hurting anything, and its creator might be fond of it.
 
The bike business is full of diabolical influences these days. Disc brakes are right up there.

They're not even trying to hide it anymore.

Speaking of diabolical, Shimano is now securing some of their shifter pods with 5-pointed Torx Plus fasteners, which originated as a security feature. What if the bolt is loose, as it was on a bike we were assembling the other day? No one in town seems to have the requisite tools for us to buy. Why, after all these decades, is Shimano suddenly obsessed with the security of its low-end shifter pods?


Another nice find on a new bike assembly is this "tubeless-ready" rim tape that's not even ready to retain a tube.


But according to the printing on the bike box, all you need to assemble a bike is "+ and - screwdrivers" (make up your mind, do we need screwdrivers or not?), water pump pliers, two sizes of hex key, and an adjustable spanner.

This fork might be a plug for responsible citizens to participate in public health measures:

Quick credit where it's due: I've ragged on a number of products sporting this logo, but I have to say that their road handlebar plugs fit very well. This is actually rare among the plastic push-in type usually included with bar wrap.


 When it comes to things for the handlebars, these grips almost rival white handlebar tape for silliness. Clear grips? What do you want to admire under there?

Another entry in the WTF category:

Most chains these days use a closure link to connect the ends, rather than pressing rivets as we used to do. The rivet press chain tool is only used to remove the unneeded links from a new chain to set it to the length required by a particular bike. In the old pressed rivet days, I would collect the orphan bits and eventually be able to assemble myself a chain. But the lower profile and reinforced shaping of the rivet heads on modern chains make the rivets unsafe to reuse. They damage the side plates when they're pressed out. The closure link snaps together without deforming the plates of the links they join.

Yeah, but why does this bike have four of them?


On some bikes I have grafted in a section of chain with a closure link at each end. Usually this is because the rider uses two different cassettes at different times, and shortens or lengthens the chain as needed, using the handy links. On most chains for ten speeds or more, you can't reuse the links, so antics like this are either expensive or dangerous, depending on whether the rider actually heeds manufacturer instructions and uses a fresh link every time, or reuses the links, risking a chain failure that could prove very painful and costly in its own way. The grafts I did were on 9-speeds and lower. I've also had to do them on bikes with absurdly long chainstays, like some comfort bikes and pedal-forward cruisers. Mountain bikes with the current bizarre mutant drive trains with huge cassettes, often on full suspension bikes, need such long chains that now the manufacturers are offering chains with up to 144 links as opposed to the old traditional 112 or 114.

If I have to lengthen a chain for a repair, I try to avoid putting closure links right next to each other. I know that technically they're supposed to be full strength. After all, pro racers are launching their heroic sprints at rocket speeds on these chains. But they still make me a little nervous. Like, we get away with one, but are we pushing our luck to stack them up? Chains do fail. The failures I've seen have been as often at one of the regular links as at a closure link, but still... early versions you could snap apart with just the right squeeze and pinch, like some 1950s Joe Cool snapping open a brassiere. Hardware and morals have evolved across the board since then.

Here's a forthright statement about how the bike industry views its customers:

And in the "weird branding" section, one can guess at what this saddle is supposed to say, but it's not stated clearly:

"Racerlike?" At least it's a Rgstyrd Trdmrk.

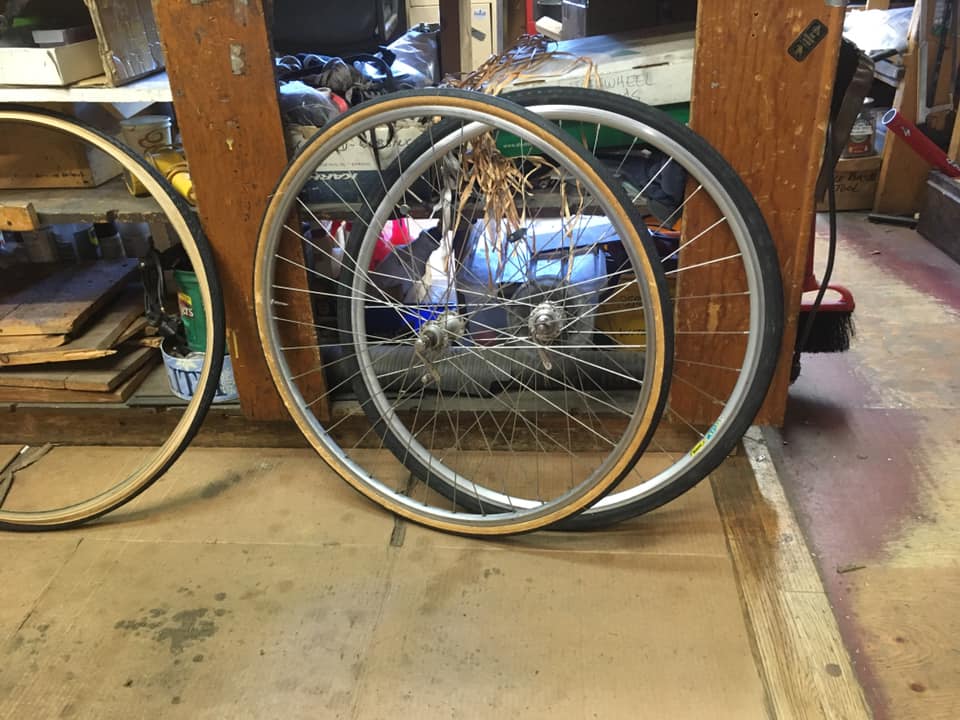
Last among the unexpected details, an early 1980s (maybe late 1970s) road bike needed -- among other things -- new tires. I had a nice pair of 700X28s. On closer inspection, one wheel was a 27-inch. Fortunately, I had a 27X1 1/8 (630-28) to match up with the 700X28 (622-28).


What if your wheel collapsed?

 Back around 1980, a once-promising racer in the Maryland scene supposedly had lost a lot of his nerve when his low spoke count front wheel folded up in a sprint, sending him down from 30 to zero in the length of his own body. For you metric users, that's 48 to zero in less than two meters. When the front wheel disappears, the glide path is pretty abrupt.

Back then, low spoke count could mean 28, or maybe 24, and lightweight spokes were called "piano wires." I wasn't around before this rider had that crash, so I never knew him at his best. He was still plenty strong and skillful, but pretty good is not good enough for national-level competition. In a strong district, it isn't even good enough for regional prominence. You have to be willing to ride to die. On top of that, you need the genetics and the training to have the motor just to stay with a field of top riders. Anything that makes you the least bit hesitant is going to cripple you.

Nasty crashes can happen to anyone, for a wide variety of reasons. Equipment failure is not limited to high performance equipment built to thin margins of safety. On the plus side, incipient equipment failures can be detected by inspecting a bike regularly. Sometimes these failures make themselves obvious, as with previous cases of spontaneous spoke or nipple failure I've reported here.

The worst case scenario is that someone hops on their recreational bike that's been sitting in storage and pedals away without noticing that a couple of spokes have failed, and manages to get up to a moderate speed -- down a hill for instance -- before the wheel folds up. Of the two, a rear wheel is only slightly preferable, since it's not going to lead directly to a face plant. You'll still hit the ground abruptly and hard. Fortunately, most of the time, other issues will prompt a person to bring their bike in for a check up before they go out, or will stop them early in their shakedown cruise, as rusted chain links or some other drive train interference make the bike too hard to ride.

One case of spoke failure this summer showed up on a Schwinn recreational bike with an internally-geared hub. It had a couple of broken spokes. This can happen in storage if something gets shoved into the bike, or it can happen when several bikes are stacked on a rack on a car, or in a crowded parking situation, or a crash.

Closer examination revealed that the spokes had simply come apart. Every spoke in the wheel was banded with rings of rust that had eaten most of the way through them, except for the ones that had already disintegrated.


If you look closely, you can see a piece of spoke at an angle, impersonating a normal bend. You could crumble these spokes in your hand, into little fragments. They had no tensile strength at all.

With the current problems getting parts, my only choice was to respoke the wheel with a different cross pattern to match the lengths of spokes available. It went from three-cross to four-cross, which will just provide a cushier ride. I built my first touring wheels four-cross because it was supposed to be better for long hauls at moderate speeds, with a load. It was all right. I've had to depart from basic three-cross on other occasions as well. It's all legit. I generally don't go below three-cross except by customer request.

Stripped down, the hub felt like something you could use to train for the shot put. It weighs 4 1/2 pounds.

My wife, who competed in the shot put as part of her track and field career in school, informed me that the women's shot is almost nine pounds, and the men's is 16. But we could have a "hub put" category added to the Huffy Toss if we ever have a bike shop field day. Regulation weight could be whatever we say. This hub was still a hefty handful. Holding it up to load the spokes, my arm started to get pumped.

Within a day or two, another wheel job came in and I reflexively wrote it up for respoking, even though we could have replaced the wheel with a complete pre-built wheel. This is another example of how cheap labor has led to replacing rather than rebuilding something because parts and labor cost more than a new unit of low to modest quality.  In the wheel department, this is nothing new. My friend in Florida worked as a contract wheel builder in the 1970s, paid by the piece. I don't know if any US supplier uses American workers for that sort of thing anymore. She also wasn't trying to support herself on the income. It was supplemental in a variety of gig jobs, in a duo with her talented and enterprising husband before he finished his aircraft mechanic certifications.

The wheel I built was better than mass-produced, and it saved a complete wheel for someone who might need it more. It's good to stay in practice. I'd observed early in the season that people don't have much use for wheel builders anymore, and promptly started getting wheel repairs and complete builds.

A conventional build doesn't take too long, which might make it seem cheap and easy, but you do need to know how to make it efficient as well as quick. Proper tensioning takes most of the building and truing time. That's the part that takes experience. It's easy to get into trouble by rushing the tensioning phase. 

Novice builders will make two common mistakes: go for lateral trueness before roundness, and stop with too little tension once the wheel is as close to perfectly true as they can get it. After they've had a few of their creations develop the wobblies because of inadequate tension, they might move on to the intermediate mistake of too much tension. You can buy a tensiometer to check whether tension is sufficient and even, but after a while you will develop a feel for it by squeezing and by how the spoke wrench feels when you turn it. Check your calibration with the tensiometer occasionally.

A big part of the cost of custom wheel building is that we only get parts at wholesale, whereas most mass-production builders get a price that is at least one tier lower, and probably even better than that. They can take a margin on parts and labor that compensates them well, and still undercut us for the same parts on the same build pattern. When we have unrestricted access to supplies, we will often spec a pre-built wheel that matches what we would have done anyway. Reputable production suppliers have become pretty good at spitting out consistently acceptable wheels. And if you want something tweaky and modern, super light and fashionable, you will have to buy complete wheels. If you want something a little more tailored, based on rim width or a preferred brand, then you have to find someone to put that together for you.

Monday, October 11, 2021

Keep your fingers out of your hole

 Whatever else might be dictated by manufacturers, like shifting systems, bottom brackets, and suspension, the human butt remains stubbornly immune to standardization. The saddle section of the parts catalog has as much -- or more -- variety as ever. Wide ones, skinny ones, hard ones, squishy ones... I mean the saddles, not the tushies.

And of course it goes beyond the buns. There's all that tender stuff that t'ain't going quietly if the saddle is a bad fit.

Saddles with "relief" have been around as long as saddles. That feature has almost become automatic in modern saddles, made of mostly synthetic materials that deteriorate in a matter of months to a few years, depending on initial quality, exposure to the weather, and intensity of use.

You do your best to find what fits your particular specifications. In my case, it was the Avocet Racing II in 1980, which was basically the same as the Selle Italia Turbo. Avocet went away, but Selle Italia remained. But the Turbo faded out, replaced by lighter models that I never developed a relationship with. About the time I couldn't scrounge new old stock Turbos, the model was reintroduced as a retro thing. I snapped one up as soon as I saw it. It turned out to be made of flimsier materials than the original, and I was already able to wear out originals.

Along came the Brooks Colt. The Colt in 2013 was a re-issue of the original that Brooks had offered in the era of the Avocet II and the Turbo, as a similar shape with the legendary durability of real leather. I noted in the months that followed that the saddle did develop indentations where my weight was heaviest on it, which led to a central ridge. Strategic softening of the leather and adjustment of the angle made it manageable, but it was not exactly comfortable a lot of the time. During this summer, I decided it was time to try a relieved saddle.

Brooks offers the B-17 with a cutout, so I got one. The basic B-17 is wider than I have liked, but I could get it for wholesale. And with current shortages of all sorts of components, I felt fortunate to be able to get anything.

It did not feel too wide when I first sat on it. Other saddles, no wider, but shaped differently, have felt totally wrong. The racier saddles can be uncomfortable when I ride at slower speeds, because they don't provide as much support when I'm riding more upright.

When you ride a saddle that is too wide for your bone structure, you get squeezed forward onto the narrower part of the saddle. The bun dents on the Colt indicated a good fit on the wide part of it.

I may put it back on, or move it to another bike after I reform it and condition the leather so that it's soft where I want it to be, but still maintains its shape.

For the first ride with the B-17, I rode to the CSA pickup with the BOB trailer. 

Might as well knock off two objectives at once. And pulling the load meant some heavier exertion on climbs, but also low-speed cruising in a more upright position.

For the CSA runs, I put a pair of black nylon cargo shorts over my tight bike shorts, just to look a little more normal among the other patrons loading their shopping bags with their shares of the produce. Because of the padding in the bike shorts and the extra layer of the outer shorts, I couldn't be quite sure where I was on the saddle relative to that cutout. Coasting along on a bit of an easy grade, I tried to reach in under the saddle to feel up through the cutout to figure out whether it was actually under the trouble zone. That's when my fingers got stuck between the seat rails where they narrowed toward the front of the saddle. I had a tense few moments as I extricated my digits. I laughed at the image of myself in a crumpled heap in the ditch, with my broken fingers jammed in the seat rails under my crotch. Explain that at the emergency room.

I had also wondered about what might get caught from above in the various slots or holes in relieved saddles. I grew up in small sailboats, where we used these things called "jam cleats." Jam cleats have v-shaped slots in them, in which one jams a dangling rope end to secure it. There are other forms with spring-loaded cams, but the simple basic type with no moving parts is a common fixture. I could imagine the notched or cutout seat acting as a jam cleat for anything that might chance to dangle. And, at the end of my ride, back at home with the loaded trailer, my overshorts did jam momentarily in the cutout as I tried to dismount.

Having logged a  bunch of commutes on the B-17, I do notice the width of it on the downstroke. So far, it does not seem to be pushing me forward, which would alter my position over the pedals and also push me forward of the cutout, negating its usefulness. Brooks does make a relieved version of the B-17 Narrow, but I couldn't get that one for wholesale. But the top on the Narrow saddle is flatter than the Colt was, which might make the uncarved version break in without forming a ridge.

Brooks makes molded-shell versions in their "all-weather" line, but then you're back in the realm of laminated materials that wear away.

Sunday, October 03, 2021

Bikes are like cars now

 Our energetic trail builder has been forging alliances all around the region for the ambitious vision of turning Wolfeboro into a unique destination for mountain biking. He recently met the owner of a prominent shop in neighboring Maine, who told him that the pandemic had provided a great opportunity to start nudging service prices up to "where they should be."

This shop owner starts from the laudable goal of paying his staff a good, livable wage. To earn this, the technicians are certified to do suspension work, provide full service to electric bicycles, and any other credentials that will look good in a simple black frame on the waiting room wall. He described it as similar to taking your car to an auto service center, where the people all wear neat jump suits and have documented training. "And you pay for that," my friend said.

And you pay for that. Thing is, the best car service I have ever gotten has been from a hard-drinking, independent genius whose shop uniform may start the day clean, but ends up fully grimed by the time he knocks off somewhere between 8 p.m. and 1:00 the next morning. You'll never find him there before noon. He's semi-nocturnal, because it suits his biorhythms and he finally gets some uninterrupted hours when the phone doesn't ring and people don't drop in on him. He has some certificates hanging crooked on the grubby walls of his waiting area, which is mostly a place for his dog to lounge. The fancy service place isn't just charging for competence and your best interests. They're charging for the jump suits and the spiffy building and the cheerful person who checks your vehicle in, and the ones who answer the phone.

I can see both sides. I hate having to interrupt a tricky bit of mechanical work to answer an insistently ringing phone or launch a party of bike renters or just answer casual questions from someone who hopes to impersonate a customer long enough to be able to ask to use our restroom. I would love to make more money and achieve respect for my knowledge and ability. But I also remember when bikes were a vehicle of true independence. If you want to invest in more and more expensive tools, and learn how to service the more and more temperamental and complicated mechanisms of the modern super bike, you may still achieve a measure of independence. But because of the complexity, and the perfect precision with which all the pieces have to work together, your freedom only lasts as long as someone can make you the parts that fit your particular marvel of modern engineering. It misses the point of the bicycle entirely.

We've gotten used to the idea that a car is old when it's been on the road for three years. People do hold onto them for longer than that, or buy them used from the first owner who loses patience, interest, or trust after three years. The used car owner then holds onto it for another three years before handing it on to the next level of owner, who can't afford to buy anything fresher, and puts up with the increasing eccentricities of an aging vehicle. Eventually the car is too degenerated to function anymore, and gets scrapped. But the system has evolved around motor vehicles to provide the parts it needs at all of these stages. My used car is a 2003. When I got it I felt warm and happy because it wasn't too old and hadn't been driven hard. But the years sneak by, and suddenly it's 17 or 18 years old, and it's been driven by me. But I can still get it fixed. Something will finally break that dooms it. Maybe by then I'll be working for The Dream Shop in Wolfeboro, earning a livable wage, so I can buy a newer old piece of junk to pilot through my declining years.

This is the vision of the crowd that wants riders to pay like drivers. There's already a bit of a used bike progression, but because parts support isn't there for obsolete high-tech bikes, the used buyer of a formerly cutting-edge bike depends a lot more on luck to get any use out of the investment before something breaks that dooms it.

Your odds are better buying a 30-year-old bike than a 10-year-old bike, or even a five-year-old bike. They're even better buying a 40-year-old bike. For instance, I just changed the gearing on this 40-year-old Motobecane road bike, to give the rider the lower gearing of a compact crank and a wider range freewheel.

I'd done the rear derailleur and freewheel earlier in the year. The other parts weren't available yet. The crank is a 74-110 arm set offered by Quality Bike Products under their Dimension house label. The rings -- bought separately -- happen to be ramped and pinned for easier shifting, but the rider is used to flat rings, and shifts in friction, so there are no clicks to coordinate. The inner ring says "for ten speed only," meaning the current version, with a skinny chain and ten cogs in the back. I had to use spacers on the chainwheel bolts to set the ring over properly for the 6-speed chain. If or when he replaces the ring later, maybe we can get a thicker one and ditch the spacers. The whole job took a fraction of the time needed to rebuild the brake lever and caliper on a mountain bike, or replace suspension pivots, or chase down electrical gremlins.

The down side to simple bikes is that the work still takes skill and art, but the machines are so starkly simple that customers don't respect the people who work on them for a living. They don't want to do the work themselves, but they assume any idiot can do it. Therefore, you must be an idiot. Many days, I agree with them. I didn't get into bikes because I wanted to work on bikes. I got into bikes because anyone could learn, and bikes offered a great alternative for a world already getting smothered in asphalt and choking on fumes 50 years ago. Emission standards improved the fume situation somewhat, but the proliferation of pavement and the culture of haste have only gotten worse. And the emissions ignored by the standards are destroying the climate itself. Widespread adoption of the bicycle by those who could, aided by a societal resolve to support that alternative, would have bought us more time to work on the traffic systems and polluting output of the motor vehicles we still legitimately needed. I would much rather sell tools and parts, and share knowledge, than clean up someone's crappy, abused piece of junk or touch my cap and bob my head respectfully to the squire when he brings his immaculate machine for me to fine tune and polish.

People can break their bikes in more profound ways than the local auto service center will see in the cars that people bring to them. Because the whole mechanism is exposed, it's all vulnerable. I don't see how a flat rate book can account for stuff like the twisted wad of this derailleur:


This rider didn't just shove it in or pedal hard enough to yank it up in the back. He rode it all the way around the dropout, making a full wrap with the chain and cable.

With the trail system and the Dream Shop fantasy, its supporters believe that if you build it, riders will come, and bring business with them. But that also assumes that the consumerist, privileged lifestyle of expensive toys ridden by highly paid people with both the leisure time and the temperament to play that way will survive much longer in the economic and social adjustments being forced on us by our decades of unwillingness to enact incremental changes to head off the problems that are now boiling over. In my research on some other service topic I found a guy's blog post from the beginning of the pandemic shutdown, about trying to make an "apocalypse-proof bike." If it has suspension and a complicated shifting system, it ain't apocalypse-proof. You want a real apocalypse-resistant bike, build yourself a fixed-gear. Find a frame with long horizontal dropouts so you can stack cogs that will allow you to get off and shift manually among a small selection of maybe four gears, tops. You'll need a two-sided hub.

The trail builder wants to build a little Bentonville North, with trails for all abilities, including completely non-technical path riders. It still ignores the real-world transportation cyclist. We have to dream our own dreams and live in the real world, negotiating our way among the indifferent majority. I guess their nod to the transportation cyclist on the open streets is the e-bike section of the service department, because the only way bikes are going to become popular is if they are actually motor vehicles. And you'll pay for that.

Friday, October 01, 2021

I'm not a doctor...

Stock photo: syringe shown is for mineral oil. Organic cotton mask by Graf Lantz. Not surgically approved.
 
Before I had to work with hydraulic brakes a lot, I didn't really know how to get the air out of a syringe correctly. When I would get an injection from a doctor, I didn't watch the procedure closely. Never stop learning! I'm not a doctor, but I play one in the workshop.

Yesterday's hydraulic fluid surgery had me rebuilding the lever and caliper of a SRAM Guide RS brake. Not only was the lever piston stuck in the characteristic way, but the caliper pistons were stuck. Water gets into the brake system in various ways. Oxidation and corrosion can follow. The glycol-based fluid SRAM uses absorbs water, so it is distributed evenly throughout the system. That reduces the effects of undiluted water pooling in a low spot, but does decrease braking power steadily, as the percentage of water increases and the boiling point of the fluid gets lower.

At least it was a front brake.

On the Lefty fork, you have to remove the brake caliper to unbolt the wheel from the axle. You should remove the wheel when working with brake fluid, to avoid contaminating the rotor. I was removing the whole brake anyway, because it had to be taken apart.

You can't start a job until the parts arrive, so that put me a bit behind schedule. The customer had hoped for the bike that day. It had been hanging in the shop for about a week, but we needed to get parts. They're lucky that the parts were available. Then nothing went according to the basic printed instructions or cheerful YouTube video tutorials, because every piston that needed to come out was jammed tightly in. I had to reassemble the caliper and put a spacer in, wrap the whole thing in a thick cushion of rags, and blast it with compressed air. That brought out three of the four pistons with varying degrees of willingness, but left one of them stubbornly buried. I had to reconfigure the spacer to hold the other pistons back a bit and leave space for the one holdout to expand into when it was finally willing. This took several tries.

The lever piston was also not responding. Compressed air doesn't help there, because the pressure vents into the upper reservoir of the lever rather than going full force against the recalcitrant piston. In that case, you can just clamp an old spoke in the vise, pointing straight up, insert it into the little hole where the brake line was connected, and tap the lever body down with a rubber mallet to dislodge the old piston. Feel free to damage that. It's not going back in. Just don't hit the lever body very hard with anything, and certainly not a metal hammer. Also be careful not to score the inside of the cylinder with the spoke end. It's pretty well guided by the size of the hole it's fed through, but if you get angry or frisky when hammering it could bend and give you worse problems than you already had. A scored cylinder will not seal, even if it just looks like a scratch. Hydraulic systems are very unforgiving.

After the tedious process of disassembly, the caliper halves and lever body need to be cleaned and inspected. Then all the new parts need to be installed cleanly and without excessive force. With the caliper pistons in particular, you're working blind once you go to shove the piston in, so you take it on faith that the seal stayed in place. There's quite a bit of resistance, because the seals have to hold sufficient pressure to stop a rider and bike going hell-bent down a rough slope. They're squared off and fit into a squared-off recess in the caliper half, but in a worst case you might fold one over partway. Once it's mangled, it's done.

The component on the bench never seems to look exactly like the examples in the manual. You have to determine whether the difference makes a difference. Are these the right instructions for this version of a component that may have been manufactured for a couple of years with the same model name and superficial appearance, but actually have critical differences inside that are not made obvious by any marking you can readily see? In that case, you may have ordered the wrong parts kit as well. The differences this time were not enough to stop the job.

Once the caliper was back together I had to assemble the lever. The current parts kit includes things that this old lever didn't use, but they were trivial. Still, getting a lively new piston in was fiddlier than getting the stuck old one out. The return spring on it fought hard against the insertion of a washer and spring clip that hold it in its proper position so that the little push rod on the cam that the lever actuates can do its thing, and all the magic juice stays in. You're working in the narrow interior of the lever body, to try to cram the spring clip at least far enough that you can coax it the rest of the way by pressing it with some object that gets it to snap into its little recess and properly engage. Except that it doesn't really snap, it just sort of stops and you have to keep peering in there with a light that you keep blocking with your own face as you try to align the light beam and your sight line to sort of confirm that you're pretty sure you've got it. That sums up almost all work on the most modern bike crap.

After successfully reassembling the whole brake, line and all, it was time to fill and bleed it. That's another fussy procedure that drips caustic brake fluid all over the place. Because it was a complete fill, there was a lot of air to chase out. The first go-round did not end with a firm lever feel. Because it always feels good on the bleed block you use to hold the caliper pistons back, you have to completely reinstall everything and test it with pads on the rotor to see if you've really got it. If not, the wheel comes out, the pads come out, the bleed block goes back in, you refill the syringes, hook everything up, perform the ritual again, and then reassemble to check, cleaning carefully as you go so that the brake fluid doesn't eat the paint on the bike or ruin the pads.

SRAM's instructions say to be sure to clean the brake fluid off of the lever and caliper, in part because the fluid's tendency to eat paint will remove the snazzy logos. Seriously? You guys have been working with this fluid -- by choice -- for how many years and you haven't come up with a way to apply the logos that's immune to it? Way to innovate.

It was well after official closing time when I left. It's bad luck to put any of the tools away when you're doing a brake bleed or a tubeless tire job until you're absolutely sure that it's a winner. I left the bike on the stand and the bleed kit strewn across the bench until I return today and make sure that no little air ninjas sneaked out of a crevice in the caliper.